House of the Rising Phoenix - Locations
Wehnimer's Landing
Upon entering the North Gate, walk a short distance south until reaching North Ring Road where the Furrier Shope is located. From there, travel west just a few steps until reaching the intersection of North Ring Road and Talon Street. Travel south down Talon Street until reaching the northwest corner of the Town Square, in front of the Raging Trak Inn. Go eastward across the northerly Town Square area, arriving at its northeast corner where it meets with Valeria Street. Go southwards along the eastern side of the Town Square, turning eastward onto Penna Street. Travel easterl along Penna Street, then southward down Cheridan Avenue to is southern end at the Cleric's Shop. Travel on eastward, passing in front of the Temple and Erebor Square. Upon reaching the end of the street, turn northwards, arriving at the western end of Wiswraith Lane, in front of the Florist Shop. Turn eastward, to the end of Wiswraith Lane, arriving at the House of the Rising Phoenix.
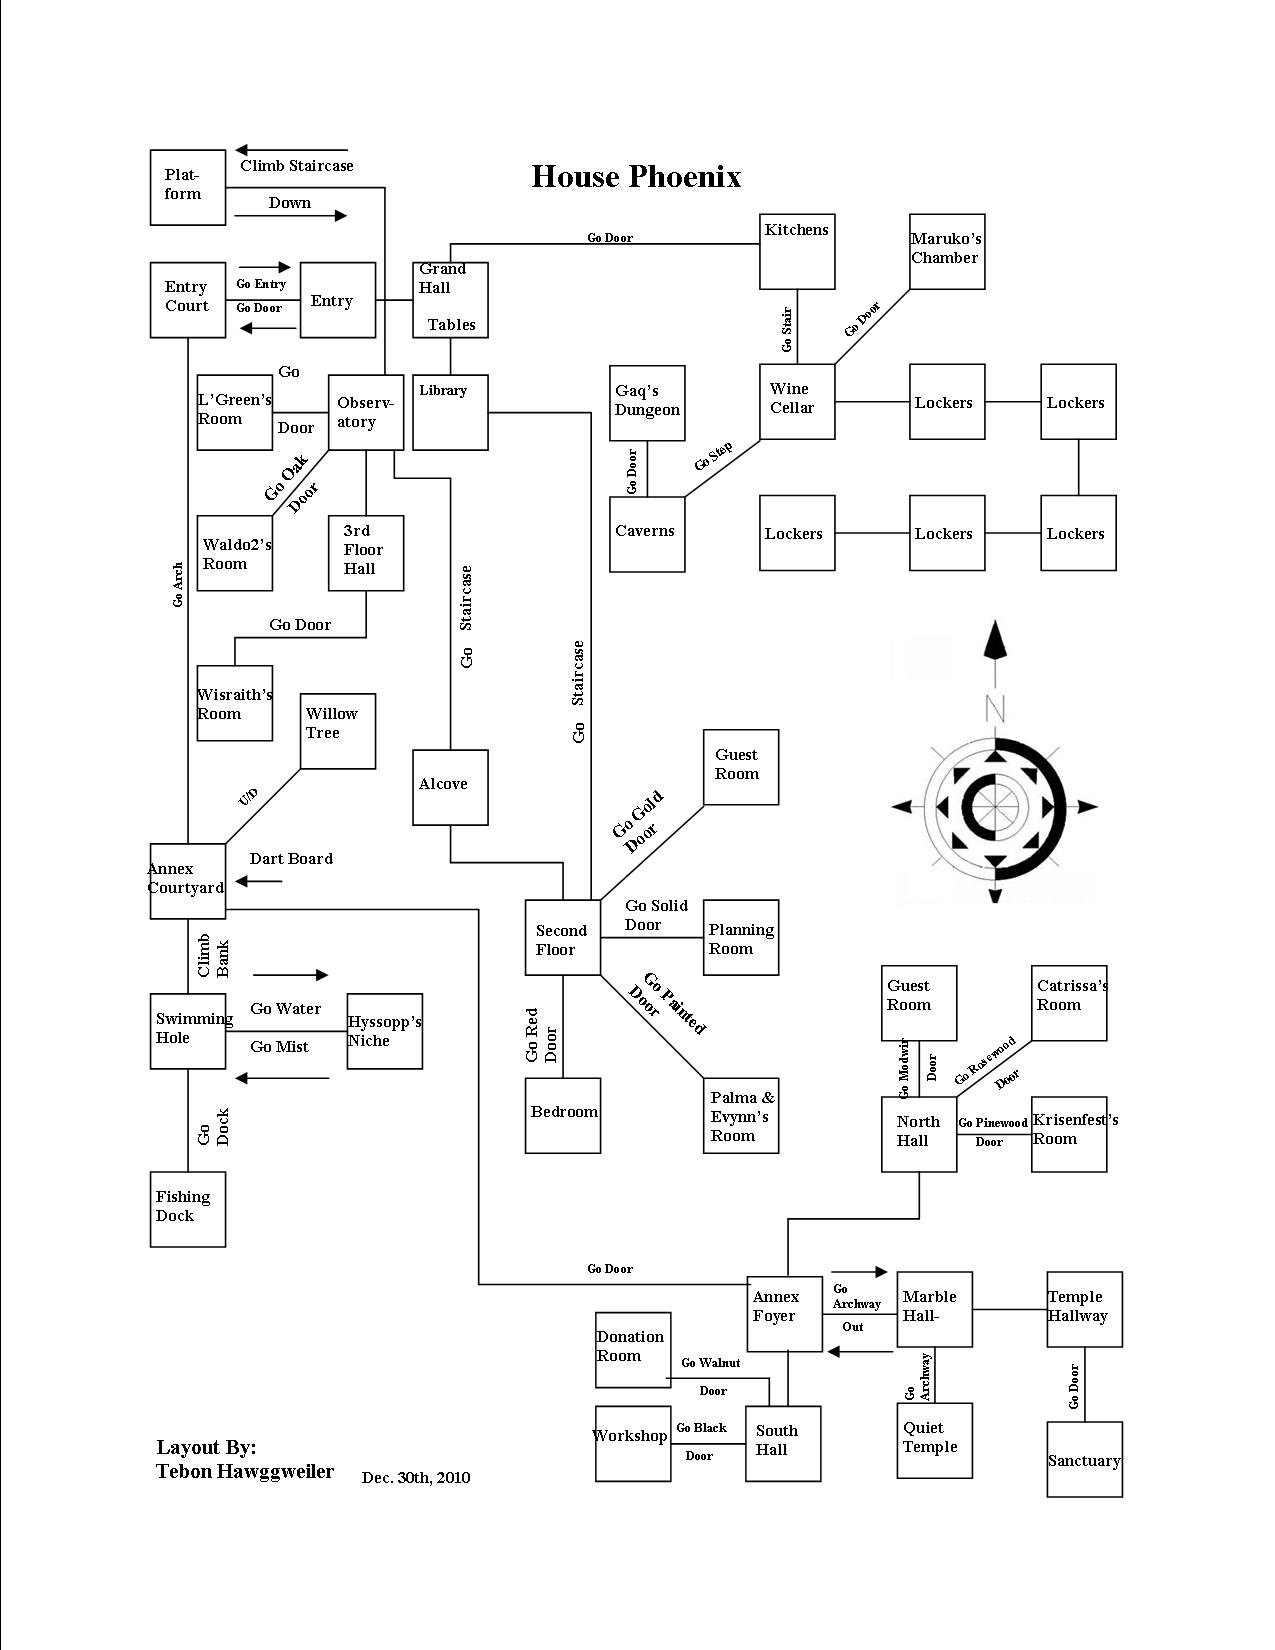
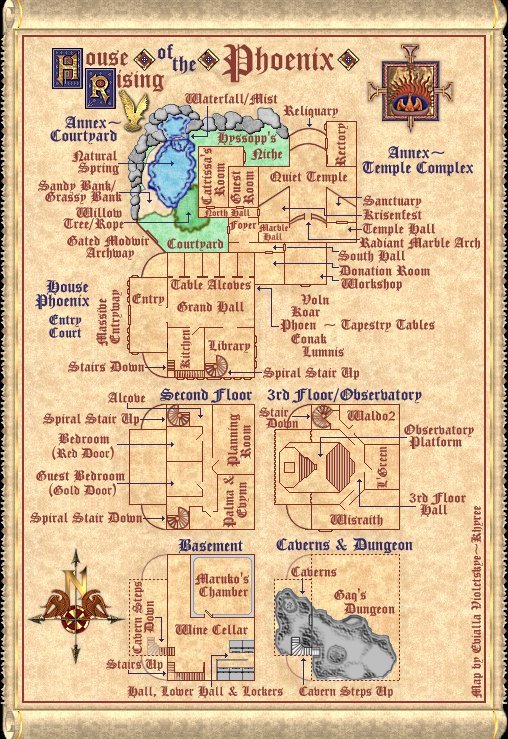
Once you arrive Tebon has sketched a Map of the interior rooms.
Teras Isle Annex
[Adventurers' Rest, Ruby Lounge]
A warm glow from the massive fireplace to your left provides an abundance of heat and light. A chaise covered in burgundy damask rests against the wall to your right, beneath a large painting in a heavy gilt frame. You also see a carved red sandstone pedestal with a ruby phoenix on it, a mistwood bookcase with an expensive bottle on it, a curved archway, a heavy slate blackboard and a wastebasket.
Obvious exits: none
>look in book
In the mistwood bookcase you see a Dwarvish tome.
>pull tome
When you pull on the tome, a hidden door swings open in front of you and you quickly scamper through it before it slams shut again.
[Ruby Lounge, Cubbyhole]
This narrow, cramped space ends abruptly at a curtain. You also see a small lever.
Obvious exits: none
Your locker in the curtain. When you are ready to leave use the lever.
>pull lever
When you pull on the lever, a hidden door swings open in front of you and you quickly scamper through it before it slams shut again.
Solhaven Annex
[Warehouse, Second Floor Hall]
This tight, north-south hallway is dark and dank. Musty smells from the warehouse below waft up though obvious gaps in the floorboards. Sawdust and discarded bent nails litter the floors. You also see a solid pine door with a tarnished brass plaque on it.
Obvious exits: north, south
>read plaque
In the Common language, it reads:
House of the Rising Phoenix
>go door
[Lockers, Antechamber]
A simple wooden chair and a short square table are the only furnishings in this bare room. The open ceiling shows the warehouse roof high above. The sounds of workers moving crates in the warehouse below can be easily heard through the thin floors. You also see a heavy slate blackboard, a curtained opening and a simple wooden wastebasket.
Obvious exits: north, out
In Solhaven we have two locker curtains. You can reach the second if the first is full by going north.
>n
[Lockers, Antechamber]
A simple wooden chair and a short square table are the only furnishings in this bare room. The open ceiling shows the warehouse roof high above. The sounds of workers moving crates in the warehouse below can be easily heard through the thin floors. You also see a curtained opening.
Obvious exits: south
Icemule Annex
This annex is located in the Gaming Hall. Here are directions from the Foyer of that building.
[Silvermule Gaming Hall, Foyer]
The high-ceilinged foyer is paved with royal blue and white marble tiles flecked with silver. A clerk smiles from behind a silver teller's cage and exchanges pleasantries with the guests. Some topiary, trimmed carefully into the shapes of spades and hearts, stands on either side of the arched doorways leading east and west. You also see a curving staircase, the front desk and a shuttered door.
Obvious exits: east, west, out
Go through the shuttered door and down the hall to the Cranberry Arch
[Cranberry Room]
A wondrous glaes mosaic of entwined cranberry plants covers the walls. The roots of the plants rise out of the dark-speckled, red marble floor. You also see a simple wooden wastebasket, a polished beechwood bookcase, a cranberry arch and a heavy slate blackboard.
Obvious exits: none
>Look in book
In the bookcase you see a tart recipe book.
>Lean book in bookcase
[Cranberry Room, Cubbyhole]
The small room ends in a dark leather curtain which is drawn shut. Remnants of old advertising slogans are painted onto the curtain. You also see a leather curtain and a small lever.
Obvious exits: none
Your locker is on a counter through the curtain. When you are ready to leave pull the lever.
Ta'Illistim Annex
Our House Lockers in Ta'Illistim are located at the Lost Home near Fraendel Court. Just enter the Foyer and go Northeast.
[The Lost Home, Foyer]
Tall columns of dark marble rise above you, supporting the high, vaulted ceiling. The black-tiled floor is covered with a large, thick forest-green carpet. On the far side of the foyer a fire is roaring in a massive basalt fireplace, sending waves of welcome heat into the room. Several comfortable looking chairs are pulled to the side of the fireplace, close enough to enjoy the fire without getting too warm. You also see a small door leading to a well-lit office, the front desk and an ornate archway.
Obvious exits: northeast, northwest, out
>ne
[East Wing]
The corridor stretches away to the northeast. High, vaulted ceilings vanish into the darkness high above, dimly lit by flaming sconces that line the walls of carved basalt. Dark tapestries hang on the walls, though in the dim light it is difficult to make out the images woven into them. You also see a marble arch with an engraved House of the Rising Phoenix placard on it.
Obvious exits: northeast, southwest
>go arch
[The Ruby Lounge]
A short marble table dominates the room. Sitting on the pedestal is a delicately carved ruby statuette. Several comfortable looking chairs sit on the thick, woven carpet, two of the chairs have been pulled close to the wide, marble hearth as if inviting quiet conversations. You also see a basket of sticks, a burning candle sconce, a heavy slate blackboard, an arch and a simple wooden wastebasket.
Obvious exits: none
Just pull the sconce.
Ta'Vaalor Annex
The House Lockers in Ta'Vaalor are located on the western side of the city and Guardian Keep on Aethenireas Way. Here are directions from the Entryway of building they are houses in, the Dancing Dahcre.
[Dancing Dahcre, Entry]
Gracious and welcoming, this well-appointed foyer is floored in a buttery cream marble, which is subtly veined with smoky grey. Blue glaesine windows are set into the walls at wide intervals, allowing a small bit of sunlight into the room. The main source of illumination is an elaborate silver chandelier hanging far above, suspended from the high, arched ceiling.
Obvious exits: east, south, southwest, out
>sw
[Dancing Dahcre, Hallway]
Blending smoothly with the creamy marble of the entryway floor, the grey-veined marble continues into the center of this winding hallway, flanked on each side with pale oak floorboards. Rose scented oil burns in a carefully suspended sconce, casting a warm glow over a walnut sideboard. Resting atop the sideboard, a shallow cut glaes bowl contains an artistic arrangement of floating candles and rose blossoms.
Obvious exits: northeast, south
>s
[Dancing Dahcre, Hallway]
The marble in this section of the long hallway features a gradual change in color from cream to pure white as the veining melds from grey to silver. Some candle-lit glaes globes mounted in concentric circles illuminate the passage. You also see a soulstone studded arch with an engraved Aspis placard on it.
Obvious exits: north, south
>s
[Dancing Dahcre, Hallway]
The pale marble and oak flooring in this section of the hallway is nearly obscured by an enormous crimson runner. Stylized flames picked out in gold and red-tinged vaalin threads occupy the center of the carpeting. An arch formed of ash-grey marble at the base blends into a deep red marble crazed with finger-like grey veins as it rises to a peak.
Obvious exits: north, east, south
>go arch
[Mystic Shield Dahcre Chamber]
Elaborately figured silken tapestries enfold this space, their scenes of heroic battles retelling the glorious deeds of the House of the Rising Phoenix. Comfortable chairs are clustered around a gold-veined onyx fireplace, above which is set a beveled glaes mirror framed in gold. Along one wall, flanked by two gold-edged banners bearing the device of a crimson phoenix on a field of black, a small bar holds libations for the weary. A faceted ruby medallion is set at the apex of the red marble arch leading into the room. You also see a polished onyx pedestal with a soaring ruby phoenix statue on it, a simple wooden wastebasket and a heavy slate blackboard.
Obvious exits: none
>tap mirror
You tap a gold-framed beveled glaes mirror.
>look mirror
As you gaze into the mirror, your vision blurs and you catch a glimpse of a familiar, faraway place. You seem to stand in the Grand Hall of House Phoenix, a place of many a merry banquet and celebration. Dominating the room is a massive modwir table. Elaborately figured silken tapestries flank the great fireplace set in the eastern wall. As you strain to catch more detail, the vision fades, leaving only your visage staring back at you.
>tap bar
You tap a small bar.
>look bar
The bar is carved from fine, aged modwir wood and set with a marble top. The marble is thickly veined with streaks of red to such an extent that it appears to be made of scarlet lace. Various bottles and flagons await your selection.
>look on bar
On the small bar you see a flagon of fine beaujolais, a decanter of warm sake and a keg of amber lager.
>look on ped
On the onyx pedestal you see a soaring ruby phoenix statue.
>look stat
Wings spread wide, the phoenix depicted in this statue appears to rise from a pile of ashes wrought from matte gold. Every surface of the phoenix has been masterfully inlaid with ruby-tinged glaes, which refracts the light in brilliant motes of iridescence.
You enter the locker chamber by pulling on the statue.
>pull stat
When you pull on the statue, a hidden door swings open in front of you and you quickly scamper through it before it slams shut again.
[Darkened Chamber]
A single glaesine sconce attached to the wall illuminates the small chamber, casting a fitfully flickering light across the room's few features. Smooth, dark-veined granite walls rise into the shadowed darkness. Dangling from a chain at one side of the room is a small mithglin ring. At the far end of the chamber is a simple curtained opening.
Obvious exits: none
When you wish to leave, pull the ring in this chamber otherwise go through the opening as usual for your locker.
>go open
You step through the curtained opening.
[Private Locker]
Jade green marble veined with cream covers the small amount of floor space, while pale oak paneling forms a modest wainscoting. A white-on-cream figured silk covers the upper portion of the walls. You also see a granite counter with your locker on it and a curtain.
Obvious exits: none
Zul Logoth Annex
Lockers are located in the sapphire tunnel within the Rockslinger Relocation Services store through the door. In order to reach the lockers take the corridor and we're in the first area.
[Zul Logoth, Sapphire Tunnel]
The sweet scent of composted wood pervades the tunnel, though the source of the odor is not readily apparent. A steel door occupies a portion of the west wall, and a burnished brass sign flanks the door. A crude stone arch along the eastern wall provides entrance to a small shop. Dwarves carrying packages and dry goods wander in and out of the shop. Some seem happy and gregarious, while others are aloof and serious. You also see a shabby hovel.
Obvious exits: north, south
>go door
[Rockslinger Relocation Services]
Several crates stand in one corner, all marked with the same destination. The rest of the room is austere. Only a stone desk and straight-backed chair break up the monotony of a grey granite floor, grey granite walls, and grey granite ceiling. Two huge luminescent toadstools in large stone pots, each occupying opposite corners, appear sufficient to light the room. A steel door allows exit to the corridors of Zul Logoth, a dark hallway extends to the west, and a wide corridor extends south. You also see a young clerk that is lying down.
Obvious exits: none
>go corr
[Rockslinger's, Annex Corridor]
A long, wide corridor extends north and south, its length lit by a huge amber toadstool planted in a large stone pot. Tightly woven, sapphire blue carpet covers the floor, muffling footsteps and providing a soft surface on which to walk. Overhead, timbers spaced two feet apart hold up the grey granite ceiling, the timber ends disappearing into the light blue marble walls on either side of the corridor. To the north the corridor widens out into a spacious room, while to the south extends more corridor. You also see the Rising Phoenix arch and the Argent Aspis arch.
Obvious exits: north, south
>go arc
[Rising Phoenix Annex]
Two huge toadstools in large stone pots illuminate a large, comfortable room. Dusky brown granite benches line two of the marble walls, facing each other across the sapphire carpet. On one wall, a brass arch allows exit to the corridor outside, while on the other wall a curtain provides entrance to the locker area. You also see a heavy granite wastebasket and a heavy slate blackboard.
Obvious exits: none
>go curt
You step through the curtained opening.
[Rising Phoenix Lockers] A small swarm of fireflies flit about in a cylindrical cage hung from the granite ceiling. Their blinking green and yellow glows softly illuminate this small room. Though the marble walls are unadorned and the granite floor is uncarpeted, the room still provides a quiet place for contemplating the contents of your locker. You also see a counter with your locker on it and a curtain. Obvious exits: none